PHYS 152 Laboratory Manual 2022
2022-01-04
PHYS 152 Lab Manual
Preface
PHYS 152 Laboratory Manual Cover
Introduction
Laboratories are a distinctive part of the physics introductory curriculum. Attendance is critical as skills are directly developed during the lab time. You will be able to explore nature using scientific principles and connect real-life experiences with the theoretical framework and models. You will also learn how to record your observations authentically and write technical, scientific reports. A central role plays the scientific documentation of experimental observations. The Lab Notebook Reports and Experimental Design engage you in activities similar to professional scientists and engineers.
You should review the following documents before starting the laboratory:
- Notebook Keeping
- Grading Rubrics
In order to successfully carry out the following experiments, first prepare by reading each laboratory guideline note, then take the online quiz. After completion of the quiz, write or print your predictions for the laboratory on a separate piece of paper and bring it to the lab. You will be able to paste the predictions into your laboratory notebook and discuss them with your peers.
Some learned skills will be reused in later experiments or the final exam. Therefore good notes help you achieve mastery more quickly.
Laboratory Guideline
The Electricity and Magnetism laboratory includes 9 Experimental Labs.
The skills learned in the laboratory supplement the PHYS 152 course work and there are some skills that may not be covered in the PHYS 152 seminar, but available only in the laboratory. Note that the Graduate Record Examination (GRE) includes 6% of physics questions on Laboratory Methods, including data and error analysis, as well as instrumentation.
The American Association of Physics Teachers (AAPT) has recently updated their stated goals and summarized them in Figure 1 by J. Kozminski et al.
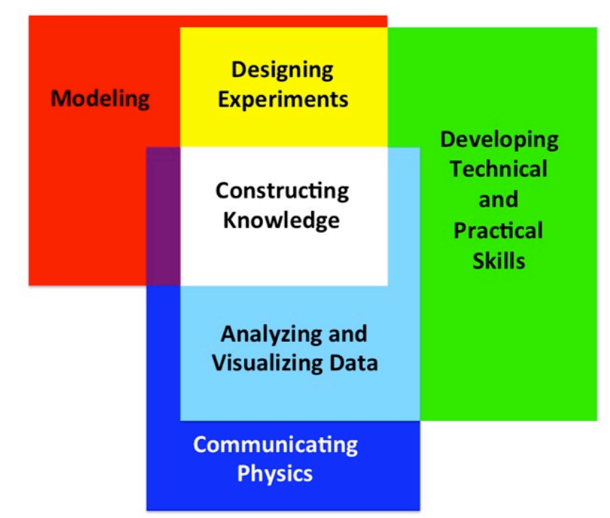 , which should summarize your lab experience.
Lab Notebook Report
The format of each lab report is structured similarly to professional publications (see Research Archives) and must include the following sections:
- title
- authors
- date
- goals
- predictions
- schematics
- procedural steps
- results / table
- graph
- summary
- reflections
These sections are explained here broadly in terms of fulfilling the the minimum requriments of the lab report (70% grade). Going beyond these expectations would increase the grade (80% to 100%).
In preparation for the lab, the experiment’s goal is paraphrased from the Laboratory Guideline Notes. The predictions are prepared at home given the limited laboratory time. It is pasted into the lab notebook before discussion time. The schematics (half page minimum) shows a detailed diagram of the entire setup used for the experiment. It must include all knobs and connections, so that someone else could replicate the experiment easily. Details, such as the four connection ports of the multimeter or the specific rows on the breadboard, should be included. Additionally, add variabls that you use in the measurement. An example is \(I\) for current, \(R_1\) for resistance. The current \(I\) could be measured at any point, so it is important for the reader to know what location you are referring to.
The procedural steps include an account of your experimental approach and also observations along the way. Use full sentences and neat writing. Units need to be included in the table, and columns clearly marked. It is important that the column names \(\Delta V\), \(I\), \(d\), are clearly explained in the schematic or elsewhere. Use a ruler (provided) for drawing a table and also a graph. The dependent variable is along the x-axis; it is the quantity that you can vary as an experimentalist. The axes require labels and units. Data points are added accurately (use ruler) or print the graph created on a computer using the network printer in the lab (set the printer to 1-page printing, so that paper is not wasted.)
Reserve about 20 minutes to write your summary and reflection at the end of the lab. The summary is one paragraph and answers the questions set forth in the “goals” section. Describe the underlying physics principle. Use quantitative answers and include uncertainties, find the main result and only include that. Briefly discuss the implications and comparisons with the predictions, include numbers, whenever possible. The reflection is also one paragraph. It is a personal point-of-view towards the experiment and includes improvements, enhancements that you would suggest, if redoing the experiment. The reflective paragraph provides the reader with more insight about how the experiment was run and possible problems that were encountered.
Include time stamps, whenever possible. Add observations that you make along the way.
In addition to these minimum requirements, the lab reports should be enhanced. Enhancements include transparent calculations of the uncertainty, discussion of the predictions, improvements to the design of the experiment, more precise measurements, depth to the tasks, technical abilities to make accurate measurements, additional measurements to confirm your method, relations between parameters, and ideas that you are testing.
Lab Notebook Features
Use a bound lab notebook with continuous pages and a table of contents. Keep your report concise, but also include sufficient details and observations and add content continually during the laboratory, not only at the beginning and at the end.
The reader can be a peer or instructor who should be able to quickly understand your report and find information. Most importantly for a scientific report, the reader should be able to find relevant information that validates your conclusions. Therefore, understanding the physical principles helps you analyze the data. The uncertainty provides you with a convenient way to compare the theoretical predictions with the experimental results and you should discuss its relevance.
Convey to the reader what is important and interesting in the experiment, prioritize those aspects of the experiment. Comprehension of the important parts is essential to preparing for the laboratory at home.
Make sure to understand uncertainty. Remember that systematic errors are unlikely for these prepared experiments. Do not include “mistakes” (human error) in the analysis, discussion, or summary; if you notice a mistake, clearly cross-out that section, while making sure it is still legible, then re-do the epxeriment and record the new data.
Lab Notebook Keeping
{#def-notebook} The purposes for keeping a lab notebook include reproducibility, ethics, communication, discovery, and patentability. Therefore, stringent record keeping is the basis of the academic and scientific endeavour.
Choice of Lab Notebook and Pen
The lab notebook needs to be bound and dedicated. No pages can be missing. No loose material can be included in the lab notebook.
All entries in the lab notebook must be made with unerasable ink. Ensure that water or other lab materials will not smear or erase the ink and select the appropriate pen.
Perparation of Lab Notebook
Your full name needs to be listed clearly (full contrast) on the front page. If needed, use tape to create a writable, non-erasable surface. Secondly, add the project name “PHYS 152 Lab” on the cover. The third item on the outside of the lab notebook is the start date of the lab notebook; add the end date, when finished.
On the inside add your contact information (email or phone) along with your full name. Add a sentence on how to return the lab notebook to you, if lost and found.
On the first page, add a table of contents. Reserve two pages for the table of contents (TOC) and number them “i”, and “ii”. The table of contents should have the following three columns: date, description, and page number. The TOC needs to be updated daily.
Number the following pages with arabic numerals. As is common, keep the page numbers at the top of the lab notebook pages. A continuous record is important. Pages, which are left empty, should be marked (cross-out with a diagonal line). It is acceptable to always use one side of each page, but it needs to be consistent (no exceptions).
Maintenance of Lab Notebook
The lab notebook is a chronological and historical record of your notes. In addition to the page number, each page should also list the date at the top of the page. For dates, spell out months (ergo Apr or April); order dates from slow to fast; i.e. yyyy-mm-dd. So start with the year, and always use 4-digits for the year. This helps with disambiguity. An example would be 2019-Aug-12.
Start each new project on a new page with the title, followed by all group members’ names (full name and contact like email).
Keep time records to provide more detail to the flow. Use clear titles and underline them to distinguish sections easily.
Always include the leading zero; i.e. 0.5 is acceptable, but not .5, since it could be confused with the number 5. For more information, see APA style
Append all numbers with SI measurement units, even in calculations. Also, note that “5 sec” would be improper, the proper way is only “5 s”, see SI Unit rules and style conventions from the National Institute of Standards and Technology (NIST).
Loose Materials
All materials need to be included neatly in the lab notebook, nothing can protrude the lab notebook, also loose materials cannot be included. Graphs and tables can be taped, but need to be taped solidly on all four sides. Extensive tables can be saved on an external file that is publicly acceessible (GitHub, etc). The filename and access needs to be included in the lab notebook.
Notebook Organization
In your lab notebook, save the first page for a table of contents. Make sure the lab notebook is bound and use only non-erasable pens. Then, on the next page, start recording all details for the lab. There is a particular order. First, add a descriptive title (not simply the lab name), date/time, and complete names (not just first names) of your group members.
Next, include the reprhased goals of the lab, and the predictions from home by taping them into the lab notebook.
After the class lab discussion, add a diagram that represent all instruments and connections and include all parameters, such as charge \(Q\) or length \(L\). This is the schematic diagram. The variables that are defined in the diagram will be used later. Next, include your table with the results, use the same variables. Jot down special information on how you chose to measure the thickness, or what kind of paper you have, any details should be added. Use full sentences. Do the calculations, add uncertainties and show at least one example of the calculations including all units. If you need to redo the calculations, or made a mistake, single-cross out the mistake and redo the work. Include a full data table, you may use several pages or print and paste.
Next, hand-draw a graph that includes labels on the x-axis and y-axis and also units. Absolutely use a ruler to make graphs and choose the scaled axes. Then add your results as data points and include the uncertainty. Analyze the data, relating them back to the prediction and initial goals. Use full sentences. Finally, write a summary that reconsiders the goals put forward and include the main result. This should be a short paragraph in length and uses mostly passive voice. It does not include the procedure, rather only the specific findings, including uncertainties. Follow-up with a personal reflection paragraph that details some of the challenges, includes new ideas, or discusses special observations that you have made personally. Use active voice for this paragraph. This completes your lab notebook report.