
Pilot Balloon Release and Tracking
Prior to release
Collect wind speed and direction data using a anemometer and make a note of
it. Have a work sheet made up with places to enter azimuth and elevation readings
from the theodolite at 1 minute intervals. Reset the timing device to 0 minutes and
seconds. Verify the alignment of the finder scope with the main objective
by training the finder scope on a distant object and checking its alignment with
the main objective after switching between them. Adjust the alignment as
necessary. Set the switch of the theodolite to use the wide angle/finder
scope. Disengage the worm drives from the circles of the theodolite (where
applicable). Make a mental note of where the sun is, so as not to track across
it while looking through the eyepiece. Serious eye damage could
occur.
The Release
The point of release should be down wind, within 50 meters of the theodolite and level with the
theodolite. In the event that a release point is below the level of the theodolite,
Do not start the timer until the balloon passes level with the theodolite.
Release the balloon start the timer. Follow the balloon by centering it in the cross hairs of the theodolite. For night time ascents follow the lighting device.
Tracking the Balloon
After the release (the first 30 seconds), track the balloon with the gun site
with the worms disengaged. The balloon will move across the theodolite
quickly at this stage and tracking it with the hand wheels will be very
difficult.
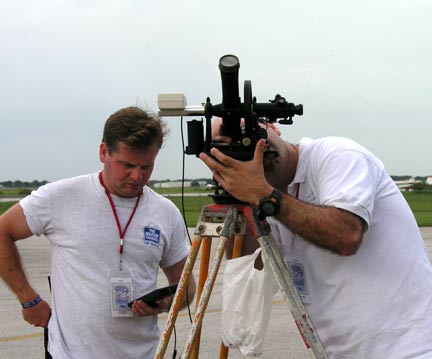
After about 20 to 30 seconds, switch over to the eyepiece (which should be set to the finder scope at this point) center the balloon in the cross hairs, engage the tangent screws and track the balloon for the next minute or so. As soon as the balloon can be held reasonably close to the the center of the cross hairs (or reticule) switch to the main objective while continuing to track the balloon. Have the person with the timer indicate 10 and 5 seconds warning before each minute. At the five second time the balloon should be being followed exactly in the cross hairs of the theodolite. At exact minute times stop following the balloon long enough to read off the azimuth and elevation from the theodolite. If the elevation is greater than 15 degrees than read and record this number to the nearest 0.1 degrees. If the elevation is less than 15 degrees than read and record this number to the nearest 0.05 degrees (estimated from the position of the micrometer or vernier). Azimuth is always read and recorded to the nearest 0.1 degree. The azimuth reading is usually given first. Readings are taken until the balloon is no longer visible or has attained the altitude planned for the termination of the observation.
It is may be advisable for the timer to read and record the angles from the theodolite, especially at night so the spotter's (eyes do not have to readjust and focus). If the balloon goes out of the field of view of the main telescope while the observer is reading the scales it is usually easy to re-sight it by switching temporarily to the auxiliary telescope. Readings should be made with the main telescope whenever possible.
Some theodolites are supplied with or can be fitted with light filters. The visibility of the image of the balloon is sometimes improved by the use of a colored light filter. Filters absorb the short-wave scattered light from haze and mist to improve the contrast between the balloon and the background sky. Different colors, such as dark red, light red, yellow and green are used according to the state of the atmosphere.
Immediately after the completion of the observation, secure the theodolite so it will not be subject to damage.
| Navigation through Pibal Observation Instructions | ||||
| Table of Contents | Introduction | Equipment Requirements | Observation Site Setup | Theodolite Setup |
| Balloons Selection and | Inflation | Release and Tracking | Computations | |