|
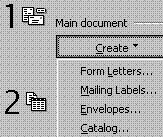
The easiest way to create a data source
in Word is to use the Mail Merge command to start a main document.
After you've created the data source, you can delete the blank main
document. In a new document window, click Mail Merge
(Tools menu), click Create, and then click Form
Letters. When Word displays a message, click Active
Window. Then click Get Data and create a
data source.
| Create a new mail-merge data source in Word
Create a form letter:
- To use an existing letter
as a form letter, open the letter.
- To create a new letter, click
New on the File menu, and
then select a letter template.
- On the Tools
menu, click Mail Merge.
- Click Create,
click Form Letters, and then click Active
Window.
The active document becomes the mail-merge main document.
Tip: You can view
the resulting form letters before you print them or send them
online. |

|
|
If the Create Data
Source dialog box is not displayed, click anywhere in
the main document, and then click Mail Merge Helper
on the Mail Merge toolbar.
|
|
Creating a Data Source
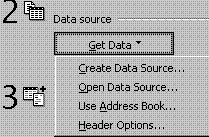
- Click Get Data.
- To create a new list of names
and addresses in Word, click Create Data Source,
and then set up the data records.
- To use an existing list of
names and addresses in a Word document or in a worksheet,
database, or other list, click Open Data Source.
- In the Mail Merge
Helper dialog box, click Get Data
and then click Create Data Source.
|
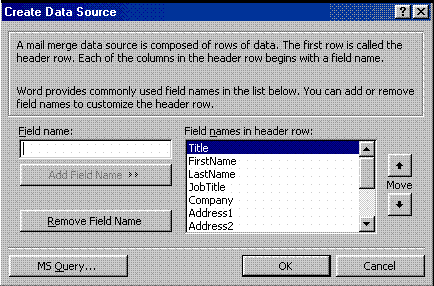
- In the Field names
in header row box, review the data fields. Word will
include in the data source all data fields in the Field names
in header row box unless you delete or change them.
- To delete a field, click
the field name in the Field names in header row box,
and then click Remove Field Name.
- To add a field, type a new
field name in the Field name box, and then click Add
Field Name.
- To change the order of the
fields, click a field name in the Field names in header
row box, and then click one of the arrow buttons.
- When the Field names in header
row box contains all of the fields you need, click
OK, and then save the data
source.
|
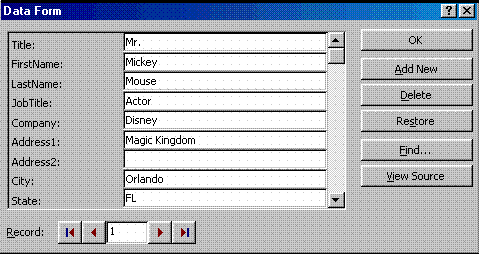
The Data Form
dialogue box comes up.
- When Word displays a message,
click Edit Data Source.
- In the Data Form
dialog box, type the information for each field, and then
press <ENTER>.
- If no information exists
for a particular field, press <ENTER>
to skip the field. Do not type spaces in the box.
- To start a new record, click
Add New.
- To return to the main document
after you've entered the information, click OK.
|
|
Word will ask you to save changes
to the data source when you close the main document.
To save changes to the data source before returning to the main
document,
- Click View
Source
- Click Save
To return to the main document,
- Click Mail Merge
Main Document on the Database toolbar.
|
Opening an Existing Data
Source
- Click Get Data.
- To opening a file you have
already created that contains the merge info (such as mailing
address names), click Open Data Source
|
|
The Open Data Source
dialogue box comes up. It is similar to the Open
dialogue box, but it presumes that you are looking for a database
type file, so the file type list is limited to database and
spreadsheet programs.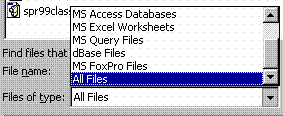
If the file is not an MS Word
document, change the Files of type: drop-down
to the correct file type, or to All Files to
see everything.
|
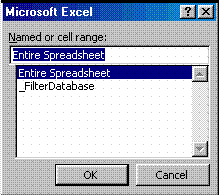
If you choose an Excel that
has filtering turned on, you have the option to select only
the portion of the database that meets your filtering criteria.
|
Editing the Main Document

- After you designate the
data source and Word displays a message, click Edit
Main Document.
- In the main document, type
the text you want to appear in every form letter.
|

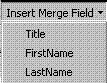
- Click where you want to
insert a name, address, or other information that changes
in each letter. On the Mail Merge toolbar,
click Insert Merge Field, and then click
the field name that you want.
|
- Select the field names,
one at a time, to place them in your document.
|
|
Merging to Printer

- After you insert all of
the merge fields and complete the main document, click Mail
Merge Helper on the Mail Merge toolbar.
- Click Merge.
- In the Merge to
box, click Printer.
- To send the form letter only
to selected addressees, click Query Options,
and then specify criteria for selecting the data records.
- Click Merge.
|
Tips
on planning a data source
- Allow enough data fields for the
data records with the most information.
- Some clients on a mailing list
might have more address information than others ¾ for example, a
business name, a department title, and up to three lines for the
address. In a data source, however, all the data records must have
the same number of data fields. If a data record doesn't have a
particular category of information, leave the field blank for that
record.
- Information you want to sort by ¾
for example, city, state, postal code, or addressee's last name ¾
must be in a separate data field.
- To speed mail delivery in the United
States, set up addresses to display postal bar codes.
- The addressee's ZIP Code and delivery
address ¾ such as a street name and number or a post office
box ¾ must be in separate data fields.
- Organize data so that you can use
it in different ways.
For example, when you set up a data source to print form letters,
plan the address information so that you can use the same data source
to print either mailing labels or envelopes. By placing the title,
first name, and last name in separate fields, you can use the same
field to print the last name in both the address (Mr. Gerard LaSalle)
and the salutation (Dear Mr. LaSalle).
|