Sorting the Data Source File
Records in the data source file are initially stored in the order that you enter them. Depending on how you want to use the data, you will want to sort the file by different fields to rearrange the records. The data file will print form letters or mailing labels in the order that the records appear in your data file.
Quick Sort in the Data Source (Table) Display
If you are working in the data source (table display) you may quickly
sort by any single field by placing the insertion point in a column
and clicking on the [Sort Ascending] ![]() or the [Sort Descending]
or the [Sort Descending] ![]() buttons in the database toolbar. This works well for smaller files,
when you only want to sort by one field. As a file gets larger, you
may often need to sort by multiple fields.
buttons in the database toolbar. This works well for smaller files,
when you only want to sort by one field. As a file gets larger, you
may often need to sort by multiple fields.
Sorting by More than One Field
You may sort by up to three fields if you use the [Query Options] button in the "Mail Merge Helper" dialog box.
If you do not have a mail merge main document and data source file open, you must do that first. Choose TOOLS, Mail Merge. Click on [Create] and select a document type, then click on [Get Data] and select Open Data Source.
If you are already in a mail merge main document, select TOOLS,
Mail Merge from the menu bar or click on the [Mail Merge Helper]
button ![]() . Click on the [Query Options] button
. Click on the [Query Options] button ![]() in the Mail Merge Helper dialog box. The "Query Options" dialog
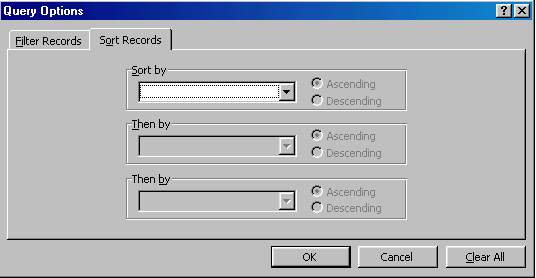
box two tabs: Filter Records and Sort Records.
in the Mail Merge Helper dialog box. The "Query Options" dialog
box two tabs: Filter Records and Sort Records.
The "Sort Records" Dialog Box
To sort the data source file, click the Sort Records tab. You can sort by up to three fields. If you only want to sort by one field, like PostalCode, click on the "Sort by" window and choose that field from the drop down list. Check the button on the right to choose between ascending and descending sorts. If you want to sort the records so that names are listed alphabetically within zip codes, click on the first "Then by" window and pick "LastName" from the field list. Click [OK] to perform the sort.

Word will store new records in the sort order you established until you close the file or until you change the sort order. When you want to start over with a completely new sort, click the [Clear All] button.
Exercise 8
In this exercise you will go through the steps to sort the file by last name then first name, which is another common order for a mailing list.
If the cursor is blinking on the blank, mail merge main document
window, where you left it after Exercise 7, click on the [Mail Merge
Helper] button ![]() on the mail merge toolbar.
on the mail merge toolbar.
If it isn't, open a blank document and choose TOOLS, Mail Merge, click [Create] and select a main document type. Then click on[Get Data], Open Data Source, and open "2001 contacts.doc".
Complete these steps:
1. Click on [Query Options] in the "Mail Merge Helper" dialog
box.
2. Click on the Sort Records tab.
3. Click in the "Sort By" window and select LastName.
4. Now click in the "Then By" window and select FirstName.
5. Make sure the sort order is Ascending for both criteria.
6. Click on [OK] to perform the sort.
7. To see the results, click on [Edit] in the Data Source
section of the "Mail Merge Helper" dialog box and open "2001 contacts.doc."
Scroll through the records to see the results of the sort.

8. Now add another person to the list of contacts, using the "Data
Form." When you click [OK] the "Data Form" dialog box will close.
Open it again by clicking the [Data Form] button ![]() on the database toolbar. Scroll through the entries. The new entry
should have been inserted in the same, last name/first name order.
on the database toolbar. Scroll through the entries. The new entry
should have been inserted in the same, last name/first name order.
Save this version of "2001 contacts."
This sort remains associated with the data source for the current session only. If you exit Word and come back to the same file to add more records later, they will not be added in the correct order. You will have to sort the file again.
Printing the Data File
In Lesson 2 you will learn about different ways to use the data source
document in various documents, and how you might generate a printed
list of some or all of your fields. For now, if you want a printed
list of all the records in the data source document, click on [View
Source] while you are in the "Data Form." When the data table
is displayed in the main document window, choose FILE, Print or click the
[Print] ![]() button on the standard toolbar.
button on the standard toolbar.
Exercise 9
Click the [Data Form] button on the Database toolbar and then click [View Source] in the "Data Form" dialog box. Click the [Print] button on the standard toolbar to print a table listing of your data.
Close the "2001 contacts"document.
Next Section --- Previous Section ---Learning Word 2000 Contents